Dymo Labelwriter 330 Turbo Software Download Windows 10
![]()
DYMO Label
Software
User Guide
Version seven.5

Equipment Information
Description: LabelWriter Direct Thermal Printer
Models: LabelWriter 300, 310, 320, 330, 330 Turbo, 400, 400 Turbo, Twin Turbo, Duo
Certification
This device has been tested and complies with the requirements of:
UL 1950
EN60950: Low Voltage Directive Production Safety
FCC Part 15 Class B
EN55022: Radiated and Conducted Emissions B
EN50082-one: Generic Immunity ESD, RF, and Transient Susceptibility
Copyright
© 2004-2006 DYMO Corporation. All rights reserved. Version seven.five Revised 01/06.
No part of this document or the software may be reproduced or transmitted in any form or past any ways or translated into some other language without the prior written consent of DYMO Corporation.
Trademarks
LabelWriter is a registered trademark of DYMO Corporation. All other trademarks are the belongings of their corresponding holders.
© 2006 DYMO
A Partition of Newell Rubbermaid
| DYMO bvba | DYMO Corporation | DYMO Purchase Registration |
| Industriepark-Noord thirty | 44 Commerce Route | Sanford Australia |
| 9100 Sint-Niklaas | Stamford, CT 06902-4561 | 1-11 Keysborough Avenue |
| Belgium | U.s. | Keysborough, Victoria 3130 |
| Commonwealth of australia | ||
| www.dymo.com | ||

Contents
Chapter 1
Introduction . . . . . . . . . . . . . . . . . . . . . . . . . . . . . . . . . . . . . . . . . . . . . . . . . . . . . . . . . . . . . . . . . . . . . . . . . . . . . one
Software . . . . . . . . . . . . . . . . . . . . . . . . . . . . . . . . . . . . . . . . . . . . . . . . . . . . . . . . . . . . . . . . . . . 1
Hardware . . . . . . . . . . . . . . . . . . . . . . . . . . . . . . . . . . . . . . . . . . . . . . . . . . . . . . . . . . . . . . . . . . 1
Labels . . . . . . . . . . . . . . . . . . . . . . . . . . . . . . . . . . . . . . . . . . . . . . . . . . . . . . . . . . . . . . . . . . . . . one
Installing the LabelWriter . . . . . . . . . . . . . . . . . . . . . . . . . . . . . . . . . . . . . . . . . . . . . . . . . . . . . two
Registering the Software . . . . . . . . . . . . . . . . . . . . . . . . . . . . . . . . . . . . . . . . . . . . . . . . . . . . . . 2
Getting Help. . . . . . . . . . . . . . . . . . . . . . . . . . . . . . . . . . . . . . . . . . . . . . . . . . . . . . . . . . . . . . . . 2
Affiliate two
Getting Started . . . . . . . . . . . . . . . . . . . . . . . . . . . . . . . . . . . . . . . . . . . . . . . . . . . . . . . . . . . . . . . . . . . . . . . . . 3
The Label Editor . . . . . . . . . . . . . . . . . . . . . . . . . . . . . . . . . . . . . . . . . . . . . . . . . . . . . . . . . . . . three
Creating a New Characterization . . . . . . . . . . . . . . . . . . . . . . . . . . . . . . . . . . . . . . . . . . . . . . . . . . . . . . . . 4
Chapter three
Using the Label Designer . . . . . . . . . . . . . . . . . . . . . . . . . . . . . . . . . . . . . . . . . . . . . . . . . . . . . . . . . . . . . 11
Starting the Designer . . . . . . . . . . . . . . . . . . . . . . . . . . . . . . . . . . . . . . . . . . . . . . . . . . . . . . . . 11
Design Objects . . . . . . . . . . . . . . . . . . . . . . . . . . . . . . . . . . . . . . . . . . . . . . . . . . . . . . . . . . . . . 11
Creating a New Characterization File . . . . . . . . . . . . . . . . . . . . . . . . . . . . . . . . . . . . . . . . . . . . . . . . . . . . 13
Opening an Existing Characterization File . . . . . . . . . . . . . . . . . . . . . . . . . . . . . . . . . . . . . . . . . . . . . . . . 13
Adding an Object . . . . . . . . . . . . . . . . . . . . . . . . . . . . . . . . . . . . . . . . . . . . . . . . . . . . . . . . . . . 14
Deleting Objects. . . . . . . . . . . . . . . . . . . . . . . . . . . . . . . . . . . . . . . . . . . . . . . . . . . . . . . . . . . . 14
Chapter 4
Working with Lists. . . . . . . . . . . . . . . . . . . . . . . . . . . . . . . . . . . . . . . . . . . . . . . . . . . . . . . . . . . . . . . . . . . . . 15
How the Address Book Works. . . . . . . . . . . . . . . . . . . . . . . . . . . . . . . . . . . . . . . . . . . . . . . . . xv
Using the Address Book . . . . . . . . . . . . . . . . . . . . . . . . . . . . . . . . . . . . . . . . . . . . . . . . . . . . . xvi
Creating a New List . . . . . . . . . . . . . . . . . . . . . . . . . . . . . . . . . . . . . . . . . . . . . . . . . . . . . . . . . 17
Opening an Existing List . . . . . . . . . . . . . . . . . . . . . . . . . . . . . . . . . . . . . . . . . . . . . . . . . . . . . 17
Using the Mac OS Address Book (Macintosh) . . . . . . . . . . . . . . . . . . . . . . . . . . . . . . . . . . . . eighteen
Chapter 5
Printing Labels Using Smart Paste . . . . . . . . . . . . . . . . . . . . . . . . . . . . . . . . . . . . . . . . . . . . . . . . . . 19
About Smart Paste . . . . . . . . . . . . . . . . . . . . . . . . . . . . . . . . . . . . . . . . . . . . . . . . . . . . . . . . . . 19
Printing Multiple Labels Using Smart Paste . . . . . . . . . . . . . . . . . . . . . . . . . . . . . . . . . . . . . . 21
iii

Chapter vi
Using the LabelWriter Printer with Other Applications . . . . . . . . . . . . . . . . . . . . . . . . . . 23
Add-In for Microsoft Word. . . . . . . . . . . . . . . . . . . . . . . . . . . . . . . . . . . . . . . . . . . . . . . . . . . 23 Additional Windows Application Add together-Ins . . . . . . . . . . . . . . . . . . . . . . . . . . . . . . . . . . . . . . . 24 Printing Directly from Other Applications . . . . . . . . . . . . . . . . . . . . . . . . . . . . . . . . . . . . . . . 25
Chapter 7
Using the Tape Editor. . . . . . . . . . . . . . . . . . . . . . . . . . . . . . . . . . . . . . . . . . . . . . . . . . . . . . . . . . . . . . . . . 27
The Tape Editor. . . . . . . . . . . . . . . . . . . . . . . . . . . . . . . . . . . . . . . . . . . . . . . . . . . . . . . . . . . . 27 Designing a Label . . . . . . . . . . . . . . . . . . . . . . . . . . . . . . . . . . . . . . . . . . . . . . . . . . . . . . . . . . 28 Press from Other Applications . . . . . . . . . . . . . . . . . . . . . . . . . . . . . . . . . . . . . . . . . . . . . . 34 Print Settings . . . . . . . . . . . . . . . . . . . . . . . . . . . . . . . . . . . . . . . . . . . . . . . . . . . . . . . . . . . . . . 36
Affiliate 8
Maintenance and Troubleshooting. . . . . . . . . . . . . . . . . . . . . . . . . . . . . . . . . . . . . . . . . . . . . . . . . . 41
Caring for the LabelWriter Printer . . . . . . . . . . . . . . . . . . . . . . . . . . . . . . . . . . . . . . . . . . . . . 41 Performing a Printer Self-Exam . . . . . . . . . . . . . . . . . . . . . . . . . . . . . . . . . . . . . . . . . . . . . . . . 42 Obtaining Technical Support . . . . . . . . . . . . . . . . . . . . . . . . . . . . . . . . . . . . . . . . . . . . . . . . . 42
Appendix A
Technical Specifications . . . . . . . . . . . . . . . . . . . . . . . . . . . . . . . . . . . . . . . . . . . . . . . . . . . . . . . . . . . . . . 45
LabelWriter Printer Specifications . . . . . . . . . . . . . . . . . . . . . . . . . . . . . . . . . . . . . . . . . . . . . 45
Tape Printer Technical Specifications. . . . . . . . . . . . . . . . . . . . . . . . . . . . . . . . . . . . . . . . . . . 46
Programmer and SDK Data . . . . . . . . . . . . . . . . . . . . . . . . . . . . . . . . . . . . . . . . . . . . . . 47
Documentation Feedback . . . . . . . . . . . . . . . . . . . . . . . . . . . . . . . . . . . . . . . . . . . . . . . . . . . . 47
iv

Chapter 1
Introduction
Congratulations on purchasing a DYMO label printer. Later but a short time, yous will realize how many of your daily tasks will exist simplified by using the label printer.
Your characterization printer will assist you to accost messages; label file folders, CD/DVDs, video cassettes, packages, and proper noun tags. With a little imagination, you volition think of hundreds of ways to use the label printer to make your job easier and more than efficient.
This User Guide provides instructions for DYMO Label Software on the Windows and Macintosh platforms. For the most part, the software operates in the aforementioned way on both platforms. Whatsoever differences in features, procedures, or commands are noted inside the text.
Software
DYMO Label Software includes many features that brand it flexible and easy to use. The software now contains two editors: Label Editor and Tape Editor. The Label Editor is much the same as previous versions of the software, allowing you to design and print DYMO die-cut labels.
With this release, DYMO Label Software includes a Tape Editor, assuasive y'all to design and impress labels on D1 tape printers. The Tape Editor is merely available if yous have a DYMO tape printer installed on your reckoner, such as the DYMO LabelWriter Duo. For instructions on using the Record Editor, encounter Chapter 7, Using the Tape Editor on page 27.
In addition, DYMO has integrated the Label Software into Microsoft® Word assuasive you to print labels quickly and easily from inside Word. For Windows, the software has as well been integrated with Microsoft® Outlook®, Palm™ Desktop, and WordPerfect®.
Hardware
The LabelWriter printer uses advanced thermal printing engineering to print on especially treated labels. This ways you volition never accept to replace toner, ink cartridges, or a ribbon to print labels.
Straight thermal press works by transferring heat from a thermal impress head to specially treated labels. The thermal print head contains a row of miniature heating elements that press against the treated label. As a heating element touches the particularly treated characterization, a thermal reaction causes the specific betoken on the characterization to plow black.
Labels
The merely supplies yous will ever need for this printer are the labels. We recommend y'all simply use DYMO-brand labels. Using labels other than DYMO-brand labels may void your warranty.
How long your labels will final depends on how the labels are used. Thermal labels are susceptible to fading in two means:
• Exposure to direct sunlight, to fluorescent low-cal for an extended period of time, or to extreme estrus will crusade fading.
• Contact with plasticizers (for example, labels placed on plastic ring binders) volition cause fading.
1
Introduction
In its original packaging, the label shelf life is 18 months. When labels are used for short-term applications (envelopes, packages, and so on), fading is non a problem. When labels are used to label files in a file cabinet, fading is very gradual over many years. Labels applied to the edge of a notebook that is and so placed on a shelf in the sun volition show signs of fading inside a few months.
To prolong label life when not in use, keep the labels stored in a cool, dry place and in the blackness bag in which they were shipped.
Installing the LabelWriter
Your LabelWriter printer shipped with a Quick Start Guide in add-on to this User Guide. Follow the instructions in the Quick Beginning Guide to install your printer and DYMO Characterization Software.
Registering the Software
Nosotros highly recommend that you register your DYMO Label Software then that you can receive customer support and production updates.
Both Windows and Macintosh users can register the software by selecting Register from the Help carte. Nonetheless, the showtime time Windows users start DYMO Label Software, you volition exist asked to register. If you choose not to register the software at this time, you lot volition exist prompted the adjacent several times yous outset the program.
To annals the software
1 Complete all of the required fields on the registration form.
2 Cull to register over the Cyberspace or print the registration form for mail or fax registration. If you annals over the Internet, wait a few seconds while your data is sent to DYMO.
3 To register past mail or fax, print the completed registration course, and mail or fax the form to the location printed on the form.
Getting Help
Before making labels, y'all should know about the various help resources bachelor to you. DYMO Characterization Software includes extensive online Aid. At times in this manual y'all will be directed to the online Aid for more detail or instructions on various topics.
To access the online Aid, exercise 1 of the post-obit
In DYMO Label Software, click Help Contents from the Assist card.
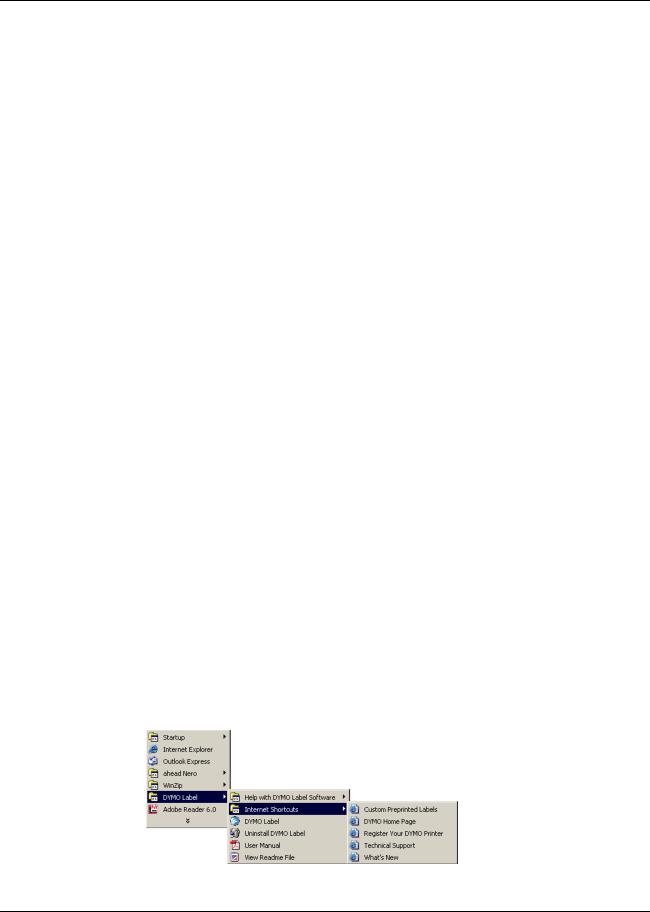
(Windows) Click Start, point to Programs > DYMO Label, then click Help with DYMO Label Software.
(Windows) Press F1 in most windows and dialog boxes for context-sensitive help.
(Windows) The DYMO Characterization card too includes Internet Shortcuts that access specific areas of the DYMO Web site, including label ordering, support, and more than.
These shortcuts are also available from the Help menu in DYMO Label Software.
2
Chapter 2
Getting Started
DYMO Label Software is a general-purpose label printing program that is specifically designed to aid you become the well-nigh benefit from your LabelWriter printer. The program includes:
• Many pre-designed labels for commonly used tasks
• A built-in Designer you lot tin use to create your ain label designs (see page 11)
• A built-in Accost Volume that lets yous relieve addresses or other types of lists (run across page fifteen)
• Add-ins to print directly from the post-obit programs: Microsoft Word
Microsoft Outlook (Windows only) Palm Desktop (Windows only) WordPerfect (Windows only)
• A Smart Paste function allowing you lot to automatically print multiple labels by copying text from other applications directly into the current characterization (see page 19)
• Database connectivity allowing y'all to print from an Access, Paradox, dBase, or Excel database (come across page 25) (Windows merely)
The Label Editor
This section introduces some basic features bachelor in the Characterization Editor.
To first the software in Windows
Click Kickoff, point to Programs > DYMO Label, and so click DYMO Characterization.
| To get-go the software in Mac OS X | |
| Open the DYMO Label binder and double-click | . |
The DYMO Label Software window appears containing a blank label.
3

Getting Started
| Select Label Roll | |||||||||||||||||
| New Open Save Print | Paste | Label Files Listing (LabelWriter Twin Turbo) | |||||||||||||||
| Menu Bar | |||||||||||||||||
| Main | |||||||||||||||||
| Buttons for | Toolbar | ||||||||||||||||
| Characterization and Tape | Formatting | ||||||||||||||||
| Editor modes (if | Toolbar | ||||||||||||||||
| both a tape and | |||||||||||||||||
| a label printer | |||||||||||||||||
| are installed) | |||||||||||||||||
| Accost | Label | ||||||||||||||||
| Workspace | |||||||||||||||||
| Book | |||||||||||||||||
| Characterization | Rulers | ||||||||||||||||
| Designer | |||||||||||||||||
Helpful
Links
Address
Volume Panel
Status
Bar
The first time you lot open DYMO Label Software, you are prompted to register the software. See "Registering the Software" on page 2. You lot are also asked to enter your return accost and select a default logo, such as your company's logo.
Creating a New Label
This tutorial guides you through the steps necessary to create, print, and save a customized characterization. The best fashion to starting time is to learn how to alter i of the pre-designed labels included with the software. In this tutorial, you will customize a aircraft label with a graphic.
NOTE You lot can print the aircraft label, used in this tutorial, on near of the LabelWriter printers. If you lot have a LabelWriter 300 printer, select this shipping label and follow the tutorial anyway. This tutorial will give you valuable information on how to access the various text and design objects, and change their attributes.
four
Creating a New Characterization
Choosing a Characterization File
The beginning footstep is to choose a label file as the basis for your new characterization.
To cull a label file
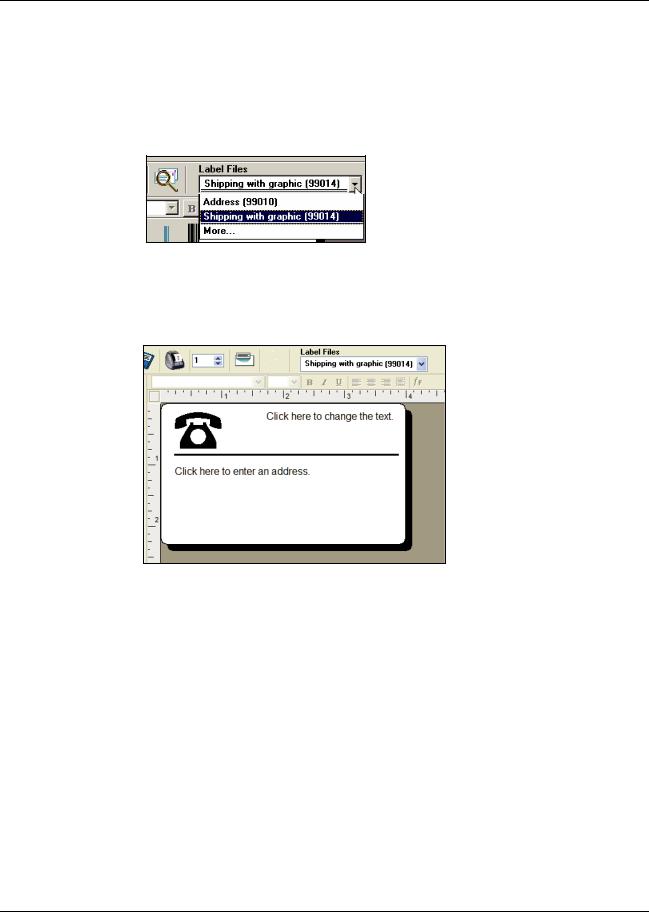
1 Select the arrow next to the Label Files driblet-down listing. A list of the virtually recently used label files appears.
 Click here to brandish the list of recently used labels.
If necessary, click More than to access all the pre-designed labels. Notice that all label files are listed with the label type starting time, and so whatsoever of import objects on the label, and finally the part number of the label.
2 Select the Shipping with graphic (99014) label.
The Aircraft with graphic label appears in the main window.
Changing the Graphic
The side by side stride is to customize the graphic. Equally you will see in this pace, each piece of data on a label is an object (for example, the render accost, the recipient address, the line, and and then on). When you double-click an object, a Settings dialog box appears where you can change the object's attributes.
v
Getting Started
To change the graphic
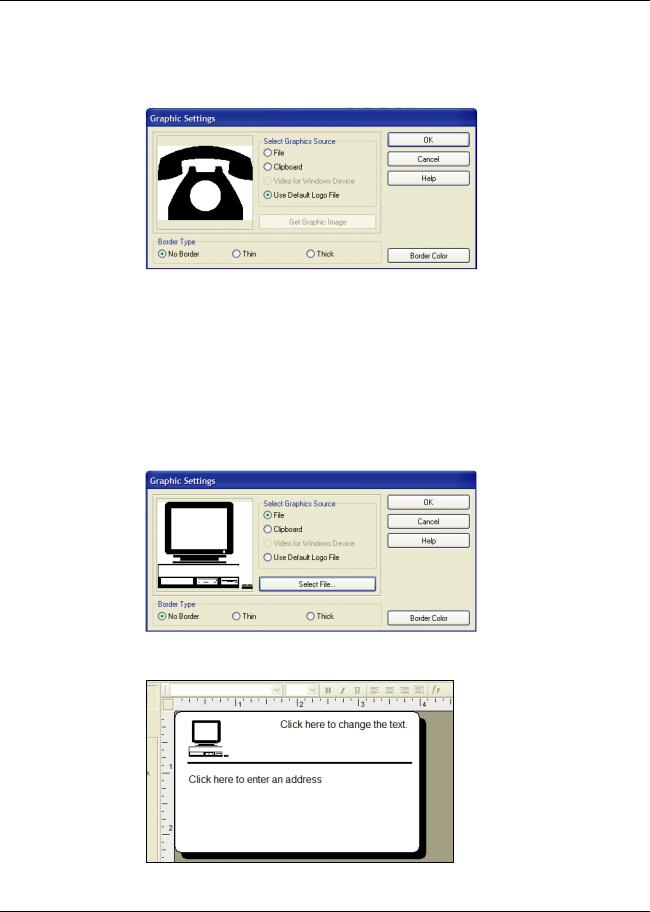
1 Double-click the graphic that appears on the label. The Graphic Settings dialog box appears.
two Select File under Select Graphics Source.
The Insert Image button changes to read Select File.
3 Click Select File.
The File open dialog box appears list the contents of the default Clipart folder.
4 Select the Miscellaneous folder and click Open. The contents of the Miscellaneous binder appear.
5 Select Comput1.bmp from the Miscellaneous folder.
A preview showing the contents of the Comput1.bmp graphic file appears in the dialog box.
half dozen Click Open.
The Comput1.bmp graphic appears in the Graphic Settings dialog box.
7 Click OK.
The reckoner graphic is placed on the label replacing the telephone graphic.
6
![]()
Creating a New Label
Changing the Return Accost
Adjacent, you change the return address.
To enter a return address
1 Click the text in the label's upper-right corner.
The flashing cursor appears where the default text had been.
Flashing
 cursor
2 Enter the following text:
COMPUTEK EUROPE B.Five. Max Euwelaan 104 3046 MA ROTTERDAM The Netherlands
3 Click anywhere exterior the text object.
The new return address appears on the label.
Irresolute the Recipient Address
Next, you enter a recipient's address.
To enter the recipient's address
1 Click once on the accost object in the center of the label. The flashing cursor appears where the default text had been.
(Windows) To help identify objects, a hint appears when you motility the arrow over an object.
7

Getting Started
two Enter the following address.
Elsbeth Meijjer Airportplein seven
NL-3045 AP ROTTERDAM The Netherlands
Elsbeth Meijjer's accost now appears as the recipient's address on the label.
Changing the Font
You may want to modify the font used for the recipient address or return accost.
To modify the font
1 Click the recipient address object. The accost text is highlighted.
two Select Times New Roman from the Font drop-down list.
three Select  from the Formatting toolbar.
The recipient address appears in the new font and way.
Printing the Label
Now that you have customized the label, you are ready to impress.
Note You can only print this shipping label on nearly LabelWriter printers. If you lot have a LabelWriter 300, review this section fifty-fifty though you lot will non be able to really print the label.
Before you print the characterization, brand certain:
• The LabelWriter printer is connected to your computer and turned on.
• You have properly loaded aircraft labels in the printer. If necessary, run into the Quick Start Guide for information on how to set your printer and load the labels.
To print the label
1 Enter the number of copies of this label to impress in the Copies field on the Principal toolbar.
ii Click  on the Master toolbar.
8
Creating a New Characterization
Saving the Characterization
Now that y'all have created your aircraft label, you can save it as a label file. Saved labels will automatically appear in the Characterization Files drop-down list.
To save the label
one Click  on the Main toolbar. The Save File dialog box appears.
ii Enter MyShip as the new name for the file and click Save.
Notice that your new label file, MyShip, is added to the superlative of the Label Files drop-down list every bit the most recently used label and also alphabetically in the listing of labels below.
To use a label file you created, cull information technology from the Characterization Files drop-downwardly listing.
Annotation To access your label files from the Label Files listing, you must store them in the Label Files binder. A default Label Files folder is created for you when the software is installed. For Windows, the binder is located in C:\Documents and Settings\All Users\Documents\DYMO Label\Characterization Files. For Macintosh, the folder is located in the DYMO Characterization folder where you installed the application.
At present that you can open up, edit, impress, and salvage a shipping characterization, y'all are gear up to modify and use about other label files.
9

Getting Started
10
Chapter 3
Using the Characterization Designer
The Label Editor allows you to easily design labels for your specific needs using a unproblematic-to-employ Characterization Designer. You can besides modify any of the pre-designed label files included with the software.
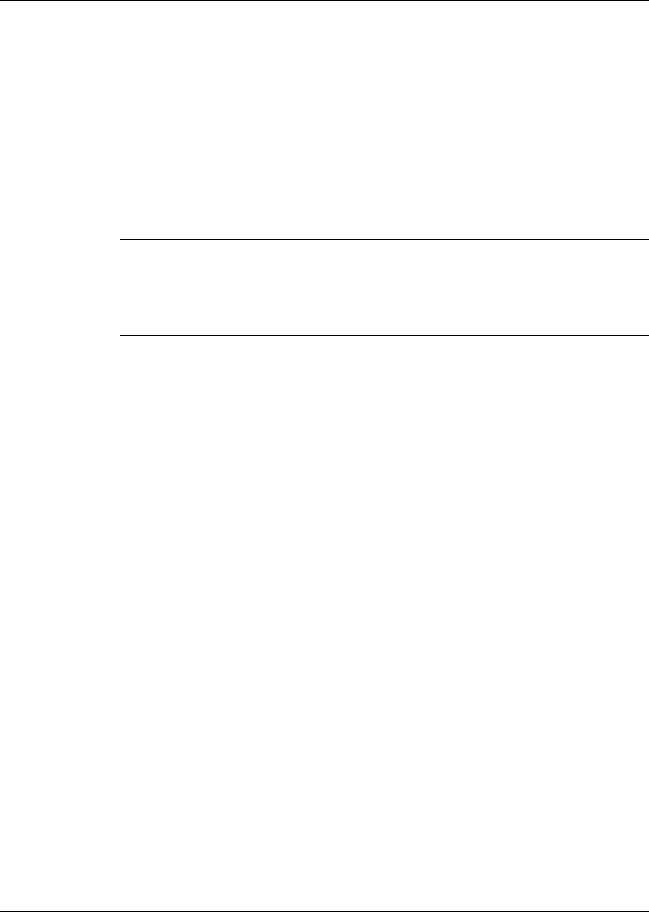
The Designer allows you to change the appearance and content of labels. You tin add or modify text (including addresses), barcodes, sequential numbers, engagement-time stamps, lines, rectangles, and circles or ellipses (Macintosh). The following figures are examples of custom label designs.
Starting the Designer
When the Designer is active, the Designer toolbar appears below the Formatting toolbar.
To start the Characterization Designer, practice 1 of the post-obit
Create a new label file. See "Creating a New Characterization" on page 4.
The Designer toolbar automatically appears.
With a label file open up, click  .
.
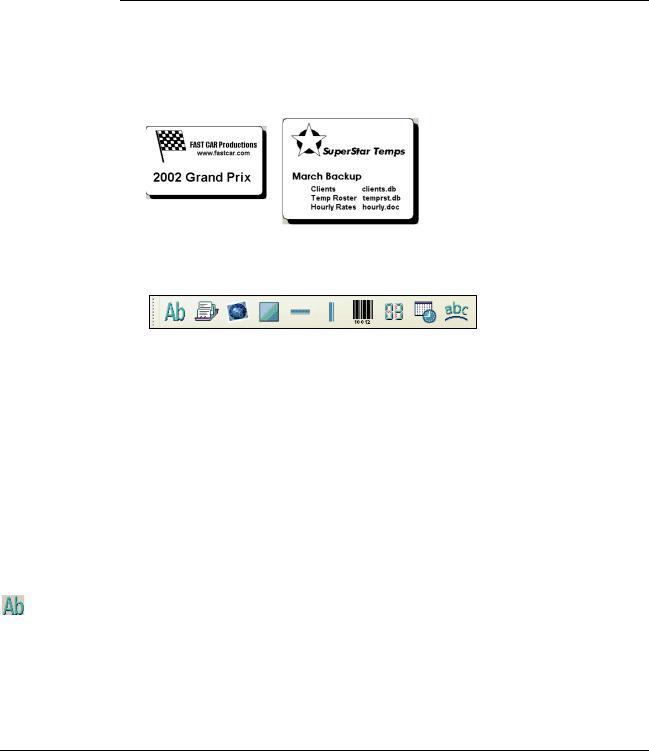
Blueprint Objects
| A label created in DYMO Label Software tin contain various text and design objects. Each object | |
| has certain attributes, such as size, position, font, and then on. You tin can select the attributes that you | |
| want in the object'south Settings dialog box. For more information on modifying object attributes, see | |
| the online Assist. | |
| This department describes each of the objects bachelor on the Designer toolbar. | |
| Text | The text object is useful for displaying information that remains unchanged every time you print a |
| new label (for example, "Hello my proper name is" on proper noun badges or your render address on shipping | |
| labels). | |
| Text objects can also be used for variable text (text that changes from label to label). This is useful | |
| for function numbers, book titles, and many other not-address items you might save as a list in the | |
| Address Book. For more than information on variable text, see the online Help. |
11
Using the Label Designer
Address
Graphic
Lines
Rectangle
Ellipse
Barcode
The accost object is similar to the text object, merely is designed to print information that changes with each label printed, such as names and addresses. Accost objects can also display POSTNET barcodes. Y'all tin change the font settings (font, size, style, and then on) for text in address objects and command the text's position. You can also apply special effects to the text.
Accost objects are by default variable text objects. Address objects tin can besides be fixed text objects. Address text is saved equally part of the label in fixed text objects. The address is not saved with the label in variable text accost objects. (Meet "How the Address Volume Works" on page 15 for more than information.)
The graphic object allows yous to add your visitor logo and other favorite graphics to labels. You tin can import many pop graphic formats, position them anywhere on the label, resize them, and fifty-fifty specify i equally the default graphic. You tin can also copy a graphic from a graphics application (such every bit Microsoft Paint or CorelDRAW), and then paste information technology onto a label. You lot tin import a graphic direct from a file or (Windows only) capture an image from a video device connected to your computer.
Note If you defined a default logo file, the graphic file yous specified is automatically displayed in any new graphic objects yous add. Come across the online Help for information about defining a default logo file.
You tin use the horizontal and vertical line objects to better a label'south appearance. Horizontal lines as well function well as visual dividers on labels (for example, between the sender and recipient'south accost on aircraft labels). You tin specify the thickness of the lines, and you can also hide lines that announced on labels.
The rectangle object, like the line objects, is primarily used as a pattern element to enhance a label'south advent. A rectangle tin can exist used to create a border around other objects. You tin specify shades of greyness to fill the rectangle. You lot can also specify the thickness of the rectangle edge.
(Macintosh) The ellipse object, like the line objects, is primarily used as a blueprint chemical element to raise a label'due south advent. An ellipse can be used to create a border around other objects. You can specify shades of gray to fill the ellipse. You can also specify the thickness of the border.
The barcode object displays and prints a barcode on your characterization. You tin can use a barcode object to display fixed information that you enter or variable data obtained from another object. When y'all link a barcode object to another object, the barcode object encodes the information independent in the linked object. Furthermore, if you change the data in the linked object, the barcode object automatically encodes the new data.
For example, you lot may want to link the barcode object to a function number text object on a label. When you update the function number in the linked text object, the barcode object is automatically updated besides.
12
Creating a New Label File
You can choose from many standard barcode symbologies, including Lawmaking 39, Code 128, Codabar, UPC A/E, EAN viii/13, ITF-14, POSTNET, PLANET, and Interleaved ii of 5 barcodes.You can choose to include or exclude human-readable text (alphanumeric information) and specify the font settings for the text. You can also select the barcode size and position. See the online Assistance for more information near the barcode symbologies supported.
The counter object automatically numbers a series of labels. For example, y'all could apply a counter object to automatically serialize a agglomeration of raffle tickets. You can specify text you lot desire to appear earlier and after the counter (for example, "Disk # of 10"), equally well every bit the starting number and the increments for counting (ane, 10, 100, and so on). You tin can also specify the font settings for the counter information, equally well as other attributes.
The date-time object stamps the current appointment and/or time on labels using any one of several of predefined formats. As with counter objects, yous tin can specify the text you want to appear in front of and behind the date-time (for example, "Today'southward date is"). You can choose from a variety of date formats, including European formats. You can include or exclude the fourth dimension and use the 24-hour time format (13:00, 22:00, and so on). Yous can control the font settings and other attributes for the datetime information.
Curved Text The curved text object is similar to the text object, but allows you to place the text along a curve. This object can be used for placing text around the perimeter of a round CD label or for just adding text in an arc on any label. You can choose to display the text as a full circle or as a semicircle along the acme or bottom of the label. You can also choose to mirror the text. As with the text object, the curved text object can be used as a variable text object and you tin can control the font settings and object position.
Creating a New Label File
DYMO Characterization Software includes a bare characterization file for every type of characterization available. When you create a new label, you select one of these bare labels equally a starting point.
To create a new label
one Click  . The New Label dialog box appears.
2 Select a characterization that most closely matches the type of label you wish to create and click OK. The blank label opens in the characterization workspace and the Designer toolbar appears.
Notation You can filter the number of labels displayed by selecting Portrait or Mural in the New Label dialog box.
Opening an Existing Label File
To use a characterization file you accept saved to disk, you only open it. You can then print the characterization as is, or alter it to arrange your needs. For convenience, the most recently saved label files announced at the pinnacle of the Label Files drop-downward list.
13
DOWNLOAD HERE
Posted by: tackitthishossn2000.blogspot.com


0 Comments